Delegation in Objective-C
在開發 iOS app 的過程中,Delegation(委任)幾乎是避不掉的東西,例如在 ViewController 裡處理 UITableView 的時候,大家一定都寫過像這樣的程式碼:
self.tableView.delegate = self
坊間的書本大多會教要這樣寫,但不一定有說明為什麼要這麼寫。其實 delegation 的概念並不困難,只是要用程式碼來表達的時候,對新手來說可能就需要多一點的想像力了。
Delegation,中文翻譯成「委任」,委任兩字講的好聽是拜託別人做事,講白一點就是自己不想做或不會做,所以外包出去叫別人做。
但是,就算是要叫別人做也不能隨便找一個路人就可以,舉個例子,我想要把「撰寫 Ruby 程式」這件事委任給別人,要有能力處理這份工作的人至少得知道 Ruby 程式怎麼寫。
那要判斷對方是否有「能力」來接受我的委任,就是問這個被委任的人是否有符合(Conform)我訂的條件(Protocol),然後這個條件就跟面試新人一樣,某些技能是必須的(Required),但其它條件是非必須的(Optional)。
一樣以 UITableView 來舉個例子,如果我希望某個 ViewController 可以有能力接受 TableView 的委任,假設這個 UITableView 是設定成一個叫做 tableView 的 IBOutlet 的話,我們可以直接在 ViewDidLoad 的地方這樣寫:
- (void)viewDidLoad
{
    [super viewDidLoad];
    _tableView.delegate = self;
}
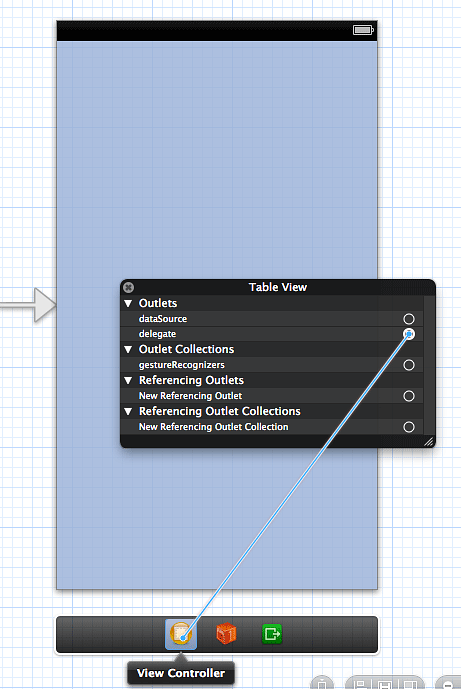
或是直接在 Storyboard 用拉的也行:

這樣就完成了 delegation 的設定啦!
但是,剛剛才講到,我怎麼知道這個 ViewController 有能力可以完成我想要委任的工作? 其實就是讓這個 ViewController 實作 UITableViewDelegate 這個 Protocol 就行了。
@interface ViewController()<UITableViewDelegate>

@end
關於 Protocol,大家可以參考之前寫的這篇
但是,UITableViewDelegate 這個 protocol 到底定義了哪些東西? 讓我們按著鍵盤的 Cmd 鍵加上滑鼠點擊 UITableViewDelegate 就可以連過去看一下它的定義(部份程式碼省略):
@protocol UITableViewDelegate<NSObject, UIScrollViewDelegate>

@optional

// ..省略

// Variable height support

- (CGFloat)tableView:(UITableView *)tableView heightForRowAtIndexPath:(NSIndexPath *)indexPath;
- (CGFloat)tableView:(UITableView *)tableView heightForHeaderInSection:(NSInteger)section;
- (CGFloat)tableView:(UITableView *)tableView heightForFooterInSection:(NSInteger)section;

// Section header & footer information. Views are preferred over title should you decide to provide both

- (UIView *)tableView:(UITableView *)tableView viewForHeaderInSection:(NSInteger)section;
- (UIView *)tableView:(UITableView *)tableView viewForFooterInSection:(NSInteger)section;

// ..省略

@end
UITableViewDelegate 這個 protocol 定義在 UIKit 的 UITableView.h 裡面,而且全部都是 optional 的,也就是說就算不實作任何這個 protocol 裡的方法也不會怎麼樣,它還是有自己預設的行為。
但如果你想要做一些 UI 客製化,例如想要動態的調整每個 cell 的高度,你就可以在這個 ViewController,也就是這個 tableview 所「委任」的對象,覆寫這個 method:
#pragma mark - UITableView delegate
- (CGFloat) tableView:(UITableView *)tableView heightForRowAtIndexPath:(NSIndexPath *)indexPath
{
    return 100.0f;
}
上面的實作這個方法,你可以想像成以下情境:
tableview 問 view controller 說:「喂,我每個 cell 要設定多高啊?」
view controller 回答:「就 100 個點(point)吧。」
再舉個例子,如果你想要客製化這個 tableview 的 section header 或 footer,就是覆寫這兩個方法:
- (UIView *) tableView:(UITableView *)tableView viewForFooterInSection:(NSInteger)section
{
    // 內容省略
}

- (UIView *) tableView:(UITableView *)tableView viewForHeaderInSection:(NSInteger)section
{
    // 內容省略
}
以此類推。
UITableView 所需要的一些行為或是外觀描述,都是透過 delegate 的方式,請被委任的傢伙(通常是那個 tableview 所在的 view controller)告知。
Delegate 怎麼寫?
上面大概說明了怎麼用別人寫好的 delegate,如果也想自己仿著做一個,該怎麼做呢?
我這邊來做個簡單的範例,大概就是希望某個 UIView 在進行動畫完成之後透過 delegate 發送一個「喂,我已經搞定囉」的通知,並同時也回傳狀態。
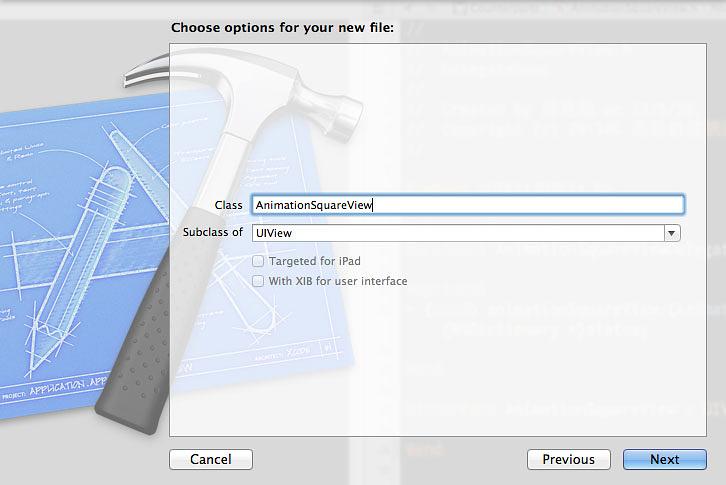
我開了一個新的 Xcode 專案,選了 Single View Application,裡面應該只有預設的 ViewController.h 跟 ViewController.m,接著我新增了一個繼承自 UIView 的類別,叫做 AnimationSquareView:

並且在上面加了一個叫做 run 的 public method:
//== 檔案:AnimationSquareView.h ==
#import <UIKit/UIKit.h>

@interface AnimationSquareView : UIView
- (void) run;
@end
// == 檔案:AnimationSquareView.m ==
#import "AnimationSquareView.h"

@implementation AnimationSquareView
- (id)initWithFrame:(CGRect)frame
{
    self = [super initWithFrame:frame];
    if (self)
    {
        self.backgroundColor = [UIColor blackColor];
    }
    return self;
}

- (void) run
{
    [UIView animateWithDuration:3.0 animations:^{
        CGRect newFrame = CGRectMake(self.frame.origin.x + 150,
                                     self.frame.origin.y,
                                     self.frame.size.width,
                                     self.frame.size.height);
        self.frame = newFrame;
        self.alpha = 0.5;
    } completion:^(BOOL finished) {
        // do something later..
    }];
}

@end
這個 run 做的事情就是在 3 秒鐘完成一個簡單的動畫(其實就是讓它自己往右邊移動 150 個點,並且透明度變 50%)。
ViewController 的部份程式碼如下:
// == 檔案:ViewController.m ==

#import "ViewController.h"
#import "AnimationSquareView.h"

@interface ViewController()

@end

@implementation ViewController

- (void)viewDidLoad
{
    [super viewDidLoad];

    AnimationSquareView* squareView = [[AnimationSquareView alloc] initWithFrame:CGRectMake(50, 50, 100, 100)];
    [self.view addSubview:squareView];
    [squareView run];
}

@end
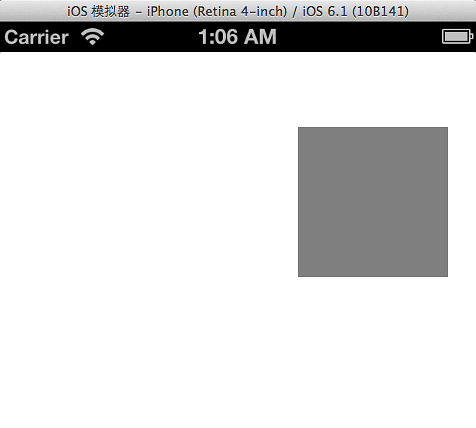
執行一下,應該會看到一個黑色的方塊緩緩的往右程動,過三秒鐘之後就停下來了:

加上 delegate
如果,我想要讓這個 ViewController 知道這個方塊什麼時候做完它的動畫效果,該怎麼做?
一種方法是可以在那個動畫 block 的 completion 區塊利用 NSNotification Center 並且在 ViewController 搭配 KVO(Key-Value Observing) 來實作,不過我們這邊選擇用 delegation。首先,我先定義一個叫做 AnimationSquareViewDelegate 的 protocol,並且在原來的 AnimationSquareview 類別裡加了一個名為 delegate 的 property:
// == 檔案:AnimationSquare.m ==
#import <UIKit/UIKit.h>

@class AnimationSquareView;
@protocol AnimationSquareViewDelegate <NSObject>

@optional
- (void) animationSquareView:(AnimationSquareView *) squareView didFinishAnimationWithStatus:(NSDictionary *)status;

@end

@interface AnimationSquareView : UIView

@property (nonatomic, weak) id <AnimationSquareViewDelegate> delegate;
- (void) run;

@end
這裡可能有些需要解釋的:
delegate這個 property 並不一定要命名為delegate,只是慣例上通常會使用delegate這個名字,你硬是要把它叫abc也行,只是在待會我們要設定 delegate 的時候就要用abc了。另外,protocol 的定義也不一定要放在同一個 header 檔裡,也可以另外獨立的檔案,不過因為這個 delegate 的行為跟這個類別有關,我通常也會把它寫在同一個檔案裡面。- 上面第 4 行,為什麼需要那個
@class AnimationSquareView;? 因為在定義 protocol 的當下,這個類別還沒被定義出來,所以@class是告訴編譯器說:「我這個AnimationSquareView是一個類別,反正我待會就會寫,你先別管這麼多」。 - Protocol 裡的方法有分兩種,一種是規定必須實作的(required),另一種則是不一定要實作的(optional),在這個範例裡,我認為
完成動畫的這個方法並不是一個一定要實作的方法,所以我把animationSquareView:didFinishAnimationWithStatus:它設定成 optional(如果沒有特別標記,就是 required 的)。 - Protocol 的名字
AnimationSquareViewDelegate也不一定要叫這個名字,只是在後面加上個Delegate似乎也是慣例。
再來,我們改寫一下剛剛那段動畫的 completion 區塊的程式碼:
// == 檔案:AnimationSquare.m ==
- (void) run
{
    [UIView animateWithDuration:3.0 animations:^{
        CGRect newFrame = CGRectMake(self.frame.origin.x + 150,
                                     self.frame.origin.y,
                                     self.frame.size.width,
                                     self.frame.size.height);
        self.frame = newFrame;
        self.alpha = 0.5;
    } completion:^(BOOL finished) {
        if ([_delegate respondsToSelector:@selector(animationSquareView:didFinishAnimationWithStatus:)])
        {
            NSDictionary* currentStatus = @{@"status": @"finished"};
            [_delegate animationSquareView:self didFinishAnimationWithStatus:currentStatus];
        }
    }];
}
這裡需要解釋的就應該就只有那段 respondsToSelector 了。這段的意思是問自己本身的這個 delegate 是不是有實作 animationSquareView:didFinishAnimationWithStatus: 這個方法,如果有的話,就呼叫它,並且把自己(self)以及狀態(一個 NSDictionary)傳入。
設定 delegate
再來,回到 ViewController 裡,準備設定我們剛剛寫好的 protocol 跟 delegate:
// == 檔案:ViewController.m ==

#import "ViewController.h"
#import "AnimationSquareView.h"

@interface ViewController()<AnimationSquareViewDelegate>

@end

@implementation ViewController

- (void)viewDidLoad
{
    [super viewDidLoad];
    AnimationSquareView* squareView = [[AnimationSquareView alloc] initWithFrame:CGRectMake(50, 50, 100, 100)];
    [self.view addSubview:squareView];
    squareView.delegate = self;
    [squareView run];
}

#pragma mark - AnimationSquareView Delegate
- (void)animationSquareView:(AnimationSquareView *)squareView didFinishAnimationWithStatus:(NSDictionary *)status
{
    NSLog(@"current status = %@", status);
}

@end
這邊多了幾行程式碼:
- 第 6 行,在類別後面加上了
<AnimationSquareViewDelegate>,就是告訴編譯器說:「我有遵守(conform)AnimationSquareView規定的 protocol」,表示可以接受 AnimationSquareView 的委任。 - 第 17 行,設定
squareView.delegate = self,把 squareView 的 delegate 設定到自己身上,也就是目前這個 ViewController。 - 第 22 行到第 25 行,就是實作 protocol 裡定義的方法。
執行一下,應該可以在動畫執行結束的時候,看到輸出結果。
那,如果第 22 行到第 25 行的程式碼沒實作出來會怎樣? 在我們這個例子,不會怎樣,因為我們並沒有在 protocol 裡設定一定要實作的方法(required)。
透過 delegation,可以降低類別與類別之間的耦合,但仍然可方便的讓類別之間有"溝通"的效果,而且也很容易的可以把要溝通的"訊息"一併傳回。
以上,希望這篇文章能讓大家對 delegation 有更進一步的了解。如果有哪邊寫錯,還請前輩先進指點。